주특기 숙련 주차에는 백엔드 끼리 협업을 하는 방법을 경험해봤다면 미니 프로젝트 주차는 백엔드 끼리 협업 뿐만 아니라 프론트 엔드와도 협업을 해볼 수 있는 기간이었다. 프론트와 백은 한 주동안 어떠한 주제에 대해서 프로젝트를 진행할 지 얘기하였고 우리 조는 벨런스게임을 만들기로 했다.
협업을 진행하면서 어려웠던 점
아무래도 프론트와 백 모두 협업을 처음 진행하다 보니 프론트와 백의역할 경계가 애매했던 것 같다. -> 아이디, 비밀번호 등의 유효성 또는 예외처리 같은 것들을 어디서 처리해야 하나 고민을 했지만 안전성을 위해 프론트와 백 모두 진행하였다.
도커로 깃액션을 사용한 자동 배포를 해보았다. 아주 잘 되었다.
무료 SSL 인증서 발급이 생각보다 많이 어려웠다. 기존의 백에서 배포를 했을 때는 HTTP로 배포를 했지만 프론트 분들은 HTTPS로 배포를하여 맞춰줄 필요가 있었다. 이를 위해 SSL 인증서를 발급받아 스프링부트에 적용을 해야했다. 처음은 Certbot으로 진행하였지만 잘 되지 않아 무료 인증서를 발급해주는 사이트를 통해 SSL 인증서를 발급받을 수 있었다.
이번 협업을 통해 중요하다고 느낀점
이번 협업을 통해 처음API 설계에 중요성에 대해 느꼈다. 항상 미니 프로젝트 전까지는 API 명세서에 작성할 때 간단하게 적어놓고 Postman이나 Swagger를 통해 API 명세서를 만들곤 했다. 하지만 프론트와 협업을 진행할 때 처음부터 API 설계를 할 때에 해당 API의url과어떤 것을 request할지, 이에 대해 어떤 내용을 response할지명확히 정해두지 않으면 백은 해당 API에서 request 받기를 원하는 데이터를 제대로 받지 못해 null이 떴고 프론트도 마찬가지로 데이터를 제대로 화면에 띄어줄 수 없는 상황이 발생하였다.
또한API 설계 명세서에 최신화의 중요성을 깨달았다. 주고받는 데이터가 바뀌거나 url에 변경이 생기는 등 무언가 수정사항이 있을 때 제때제때 설계 명세서에 반영해놓지 않으면 프론트와 백 모두 혼선을 야기할 수 있다. 따라서 무언가API 설계 명세서에 대해 변경점이 생기면 변경점에 대해 수정을 해놓고 서로에게 어디에서 이러한 변경점이 생겼다 ~~ 얘기해주는 것이 좋을 것 같다.
💡 A proper introduction to the WebSocket protocol is beyond the scope of this document. At a minimum however it’s important to understand that HTTP is used only for the initial handshake, which relies on a mechanism built into HTTP to request a protocol upgrade (or in this case a protocol switch) to which the server can respond with HTTP status 101 (switching protocols) if it agrees handshaking. Assuming the handshake succeeds the TCP socket underlying the HTTP upgrade request remains open and both client and server can use it to send messages to each other.
26.1.2 A Messaging Architecture
💡 By contrast a WebSocket application may use a single URL only for the initial HTTP handshake. All messages thereafter share and flow on the same TCP connection.
26.1.3 Sub-Protocol Support in WebSocket
💡 Unlike HTTP, which is an application-level protocol, in the WebSocket protocol there is simply not enough information in an incoming message for a framework or container to know how to route it or process it. Therefore WebSocket is arguably too low level for anything but a very trivial application. For this reason the WebSocket RFC defines the use of sub-protocols. The use of a sub-protocol is not required, but even if not used, applications will still need to choose a message format that both the client and server can understand. STOMP-a standard messaging protocol is widely supported and well suited for use over WebSocket and over the web.
26.1.4 Should I use WebSocket?
💡 It is the combination of both low latency and high frequency of messages that can make the use of the WebSocket protocol critical. The Spring Framework allows @Controller and @RestControllerclasses to have both HTTP request handling and WebSocket message handling methods.
26.2 WebSocket API
WebSocketHandler
import org.springframework.web.socket.WebSocketHandler;
import org.springframework.web.socket.WebSocketSession;
import org.springframework.web.socket.TextMessage;

*//implement WebSocketHandler or more likely extending either
//TextWebSocketHandler or BinaryWebSocketHandler*

public class MyHandler extends TextWebSocketHandler {

    @Override
    public void handleTextMessage(WebSocketSession session, TextMessage message) {
        // ...
    }

}
WebSocketConfig
import org.springframework.web.socket.config.annotation.EnableWebSocket;
import org.springframework.web.socket.config.annotation.WebSocketConfigurer;
import org.springframework.web.socket.config.annotation.WebSocketHandlerRegistry;

@Configuration
@EnableWebSocket
public class WebSocketConfig implements WebSocketConfigurer {

    @Override
    public void registerWebSocketHandlers(WebSocketHandlerRegistry registry) {

				*//mapping the WebSocket handler to a specific URL*
				registry.addHandler(myHandler(), "/myHandler");
    }

    @Bean
    public WebSocketHandler myHandler() {
        return new MyHandler();
    }
}
WebSocket Handshake
@Configuration
@EnableWebSocket
public class WebSocketConfig implements WebSocketConfigurer {

    @Override
    public void registerWebSocketHandlers(WebSocketHandlerRegistry registry) {
        registry.addHandler(new MyHandler(), "/myHandler")
            .addInterceptors(new HttpSessionHandshakeInterceptor());
    }

}
💡 The easiest way to customize the initial HTTP WebSocket handshake request is through a HandshakeInterceptor, which exposes "before" and "after" the handshake methods. Such an interceptor can be used to preclude the handshake or to make any attributes available to the WebSocketSession.
26.2.6 Configuring allowed origins
💡 The default behavior for WebSocket and SockJS is to accept only same origin requests. It is also possible to allow all or a specified list of origins. The 3 possible behaviors are: 1) Allow only same origin requests (default)2) Allow a specified list of origins: each provided allowed origin must start with http:// or https:// 3) Allow all origins: to enable this mode, you should provide ’’ as the allowed origin value.*
26.3 SockJS Fallback
26.3.2 Enable SockJS
@Configuration
@EnableWebSocket
public class WebSocketConfig implements WebSocketConfigurer {

    @Override
    public void registerWebSocketHandlers(WebSocketHandlerRegistry registry) {
        registry.addHandler(myHandler(), "/myHandler").withSockJS();
    }

    @Bean
    public WebSocketHandler myHandler() {
        return new MyHandler();
    }
}
26.3.6 SockJS and CORS
💡 If you allow cross-origin requests the SockJS protocol uses CORS for cross-domain support in the XHR streaming and polling transports. Therefore CORS headers are added automatically unless the presence of CORS headers in the response is detected.
26.4 STOMP
💡 The WebSocket protocol defines two types of messages, text and binary, but their content is undefined. The use of a sub-protocol is optional but either way client and server will need to agree on some protocol that defines message content. STOMP can be used over any reliable 2-way streaming network protocol such as TCP and WebSocket. Although STOMP is a text-oriented protocol, the payload of messages can be either text or binary*.*
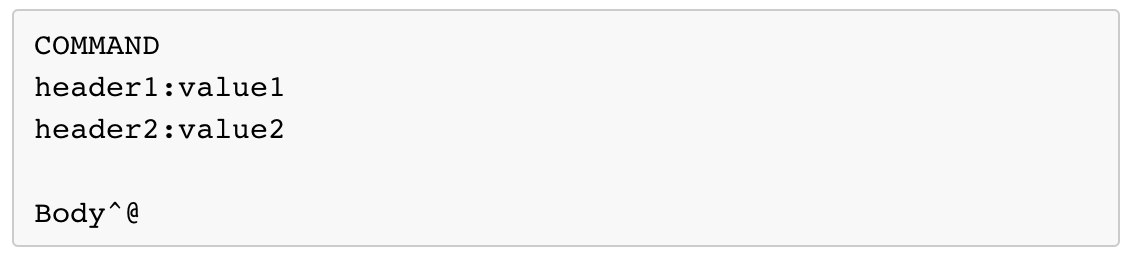
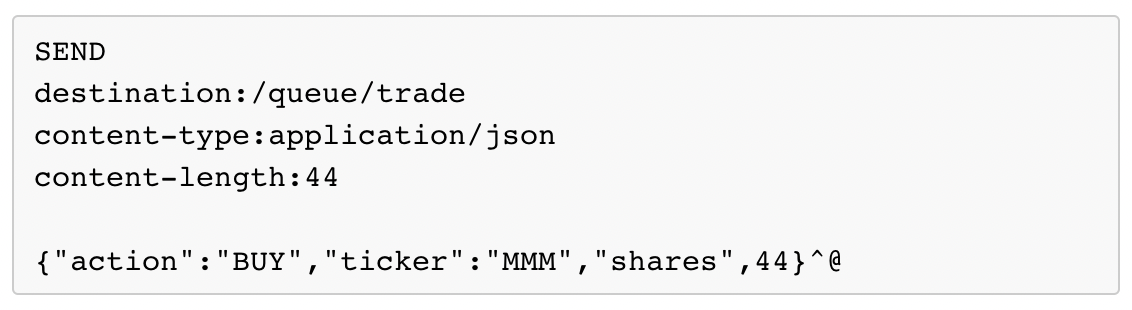
STOMP Protocol)
[structure of STOMP frame]
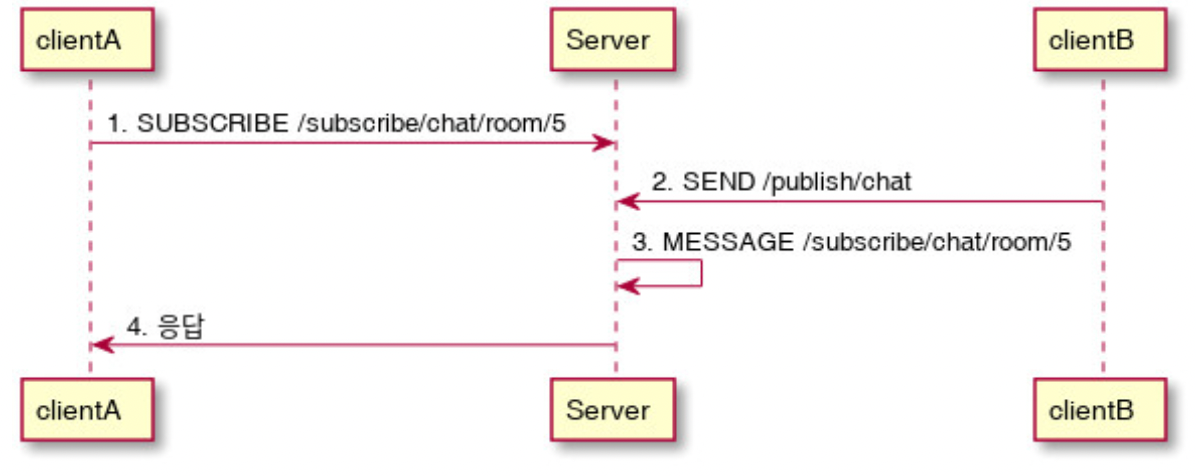
관례상 메세지를 교환할 때 “/topic/..”은 pub-sub이 one-to-many일 때, “/queue/’는 one-to-one일 때 사용한다.
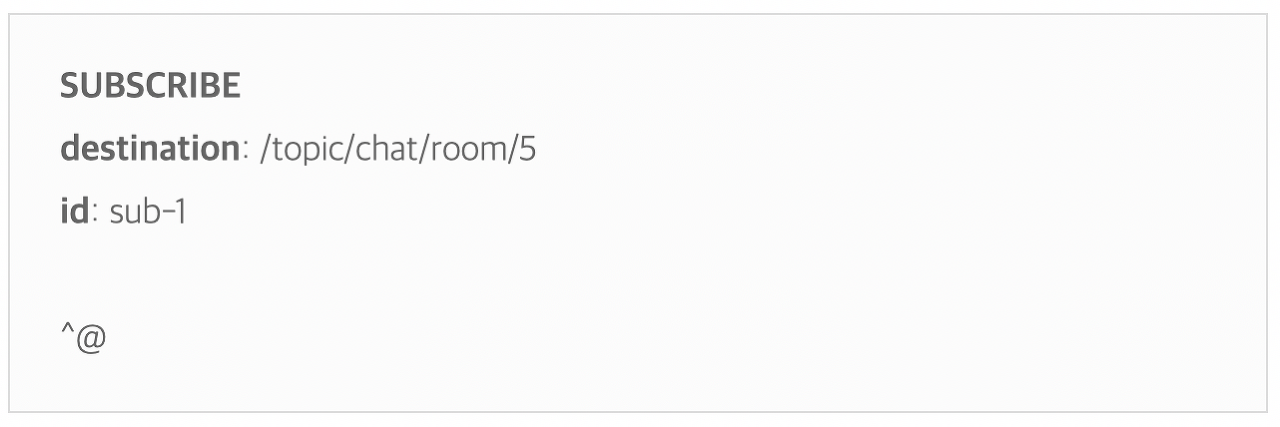
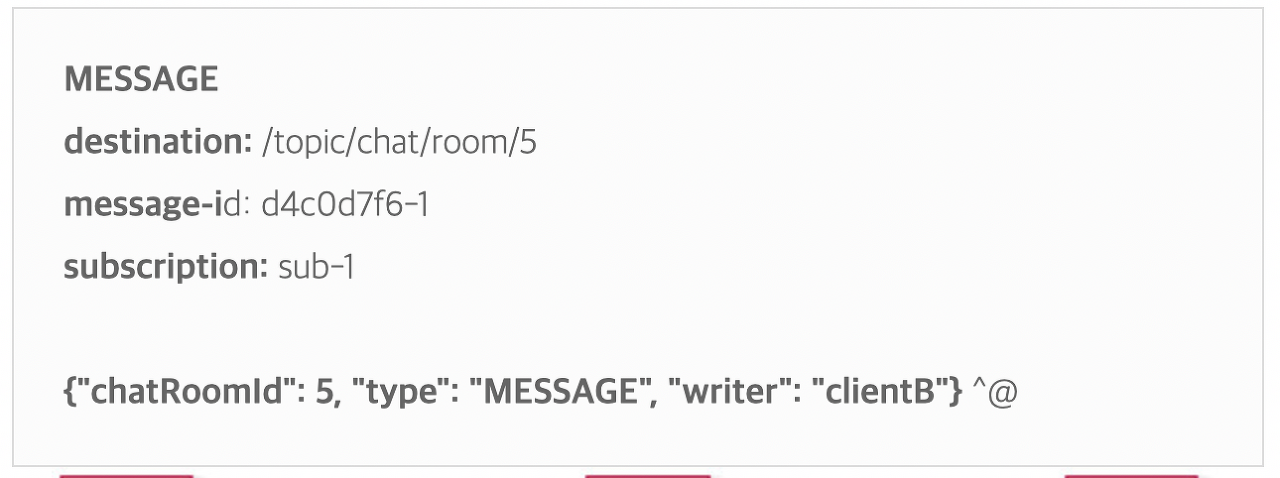
ClientA가 5번 채팅방에 대해 SUBSCRIBE(구독)을 하는 예시)
ClientB에서 채팅 메세지를 보내는 예시) 서버는 내용을 기반(chatRoomId)으로 메세지를 전송할 broker에 전달한다. (topic을 sub로 보아도 될 것 같다)
STOMP server는 모든 구독자들에게 메세지를 broadcast 하기 위해 Message command 사용이 가능하다.
💡 Clients can use the SEND or SUBSCRIBE commands to send or subscribe for messages along with a "destination" header that describes what the message is about and who should receive it. This enables a simple publish-subscribe mechanism that can be used to send messages through the broker to other connected clients or to send messages to the server to request that some work be performed.
[문서해석]
클라이언트는 메세지의 내용과 누가 해당 메세지를 받을 것인가에 대한 정보를 알려주기 위해 SEND나 SUBSCRIBE 커맨드 사용이 가능하다. 이는 pub-sub 메커니즘을 사용하여 브로커를 통해 다른 클라이언트에게 메세지를 보내거나 수행되어야 할 기능들을 서버에 요청하기 위한 메세지 송신을 가능하게 한다.
💡 Publisher-Subscriber Model이란?
Pub/Sub 구조는 비동기식(async) 메세징 패턴이다.
Pub과 Sub은 메세지를 특정 수신자에게 다이렉트로 전달하는 시스템이 아니다. Pub은 메세지를 topic을 통해서 카테고리화하고 Sub은 그 topic을 구독함으로써 메세지를 읽어올 수 있다. Publisher은 topic에 대한 정보만 알고 있고, Sub도 topic만 바라보기 때문에 Pub과 Sub은 서로를 모르는 상태이다.
Pub는 Sub에 대한 정보를 몰라도 일단 메세지를 Broker(Channel)에 보내놓는다. 이 때 메세지에 맞는 Topic으로 보내놓으면, 해당 Topic을 구독중인 Sub에게만 메세지가 가게 된다.
26.4.4 Flow of Messages
-default broker 사용
(RabbitMQ와 같이 external borker을 사용하는 케이스는 공식 문서 참고)
SimpleBroker은 SUBSCRIBE 중인 다른 클라이언트들에게 메세지를 보낸다. 또한 SimpleBroker은 클라이언트의 SUBSCRIBE 정보를 자체적으로 메모리에 유지한다.
clientInboundChannel : WebSocket Client로부터 들어오는 요청을 전달하며, 클라이언트로부터 받은 메세지를 전달한다.
brokerChannel : Server 내부에서 사용하는 채널이며, 이를 통해 SimpleAnnotationMethod는 SimpleBroker의 존재를 직접 알지 못해도 메세지를 전달할 수 있다. 서버의 어플리케이션 코드 내에서 broker에게 메세지를 전달한다.
Message : headers와 payload를 포함하는 메세지의 표현
MessageHandler : Message 처리에 대한 계약
SimpleAnnotationMethod : @MessageMapping 등 Client의 SEND를 받아서 처리한다.
SimpleBroker : Client의 정보를 메모리 상에 들고 있으며, Client로 메세지를 보낸다.
[과정]
@Configuration
@EnableWebSocketMessageBroker
public class WebSocketConfig implements WebSocketMessageBrokerConfigurer {

    @Override
    public void registerStompEndpoints(StompEndpointRegistry registry) {
        registry.addEndpoint("/portfolio").withSockJs();
    }

    @Override
    public void configureMessageBroker(MessageBrokerRegistry registry) {
        registry.setApplicationDestinationPrefixes("/app"); *//For convenience, will use "/pub" later*
        registry.enableSimpleBroker("/topic"); *//For convenience, will use "/sub" later*
    }

}

@Controller
public class GreetingController {

		//same as "/pub/greeting"
    @MessageMapping("/greeting") {
    public String handle(String greeting) {
        return "[" + getTimestamp() + ": " + greeting;
    }

}
💡 “/portfolio” is the HTTP URL for the endpoint to which a WebSocket (or SockJS) client will need to connect to for the WebSocket handshake. STOMP messages whose destination header begins with “/app”are routed to @MessageMapping methods in @Controller classes. Use the built-in, message broker for subscriptions and broadcasting; Route messages whose destination header begins with "/topic" or "/queue" to the broker.
[문서 해석]
“/portfolio”는 websocket과의 handshake을 위해 연결되어야 할 endpoint를 의미한다. “/app”으로 destination 헤더가 시작되는 STOMP 메세지들은 컨트롤러에서 @MessageMapping(SEND)로 경로한다. “/topic” 이나 “/queue”로 destination 헤더가 시작되면 브로커로 바로 향하게 된다(SUBSCRIBE).
클라이언트가 SUBSCRIBE command를 “/topic/greeting” 이라는 destination 헤더를 보내면 우선 STOMP frame으로 decoding된다. decoding된 내용은 Spring 메세지 형태로 전환되며 이후 “clientInboundChannel”로 보내져 클라이언트의 구독 정보를 저장하고 있는 message broker로 라우팅된다.
클라이언트는 SEND command를 “/app/greeting”으로 보낸다. “/app” prefix는 어노테이트 된 컨트롤러로 라우팅 될 수 있게 해준다. 이후 “/app” prefix는 잘려지고, 남은 “/greeting” 부분은 컨트롤러에 있는 @MessageMapping와 매핑된다.(걍 pub으로 요청되었다가 나갈 때는 sub 붙여서 나가는거임). STOMP가 핸들러의 역할을 대신 해주므로 핸들러는 없어도 된다.
메세지는 brokerChannel로 보내지고 이후 message broker에 의해 핸들된다.
*message broker은 반환된 값과 일치하는 모든 구독자들을 찾아 **“clientOutboundChannel”*을 통해 MESSAGE command를 보낸다. 여기서 “clientOutboundChannel”은 메세지가 STOMP frame으로 다시 인코딩되어 WebSocket 연결쪽에 보내는 역할을 한다.
26.4.5 Annotated Controllers
@MessageMapping : 목적지로 메세지를 라우팅해준다. @MessageMapping은 다양한 signatures(서명)을 갖을 수 있는데 자세한 내용은 공식문서를 참고하기로 하자. @MessageMapping 메소드에서 리턴된 값은 MessageConverter를 통해 payload로 serialized 되고, 이후 “brokerChannel”에 message가 보내지게 된다.
@SubscribeMapping : @MesageMapping이 destination을 특정하는 반면 @SubscribeMapping은 메세지 정보만 포함하고 있다. 이 annotation을 사용하게 되면 컨트롤러의 리턴 값이 “brokerChannel”이 아닌 “clientOutboundChannel”로 보내지게 된다. 따라서 broker을 통해서 broadcasting이 되는 것이 아닌, 클라이언트에게 직접적으로 메세지가 전달되게 된다. 이는 request-reply가 one-off로 끝날 때 사용하기 유용하다.
@MessageExceptionHandler : 컨트롤러에 해당 핸들러를 적용할 수 있다. 이를 더 전역적으로 관리하고 싶다면 @ControllerAdvice를 선언하여 사용하자.</aside>클라이언트는 메세지의 내용과 누가 해당 메세지를 받을 것인가에 대한 정보를 알려주기 위해 SEND나 SUBSCRIBE 커맨드 사용이 가능하다. 이는 pub-sub 메커니즘을 사용하여 브로커를 통해 다른 클라이언트에게 메세지를 보내거나 수행되어야 할 기능들을 서버에 요청하기 위한 메세지 송신을 가능하게 한다.
Key, Value구조의 비정형 데이터를 저장하고 관리하기 위한 오픈 소스 기반의 비관계형 데이터 베이스 관리 시스템 (DBMS)입니다.
데이터베이스, 캐시, 메세지 브로커로 사용되며 인메모리 데이터 구조를 가진 저장소입니다.
* db-engines.com 에서 key, value 저장소 중 가장 순위가 높습니다.
캐시 서버(Cache Server)
데이터베이스는 데이터를 물리 디스크에 직접 쓰기 때문에 서버에 문제가 발생하여 다운되더라도 데이터가 손실되지 않습니다. 하지만 매번 디스크에 접근해야 하기 때문에 사용자가 많아질수록 부하가 많아져서 느려질 수 있는데요.
일반적으로 서비스 운영 초반이거나 규모가 작은, 사용자가 많지 않은 서비스의 경우에는WEB - WAS - DB의 구조로도 데이터 베이스에 무리가 가지 않습니다.
하지만 사용자가 늘어난다면 데이터 베이스가 과부하 될 수 있기 때문에 이때 캐시 서버를 도입하여 사용합니다.
그리고 이 캐시 서버로 이용할 수 있는 것이 바로Redis입니다.
캐시는 한번 읽어온 데이터를 임의의 공간에 저장하여 다음에 읽을 때는 빠르게 결괏값을 받을 수 있도록 도와주는 공간입니다.
같은 요청이 여러 번 들어오는 경우 매번 데이터 베이스를 거치는 것이 아니라 캐시 서버에서 첫 번째 요청 이후 저장된 결괏값을 바로 내려주기 때문에 DB의 부하를 줄이고 서비스의 속도도 느려지지 않는 장점이 있습니다.
캐시 서버는Look aside cache패턴과Write Back패턴이 존재합니다.
- Look aside cache
1. 클라이언트가 데이터를 요청
2. 웹서버는 데이터가 존재하는지 Cache 서버에 먼저 확인
3. Cache 서버에 데이터가 있으면 DB에 데이터를 조회하지 않고 Cache 서버에 있는 결과값을 클라이언트에게 바로 반환 (Cache Hit)
4. Cache 서버에 데이터가 없으면 DB에 데이터를 조회하여 Cache 서버에 저장하고 결과값을 클라이언트에게 반환 (Cache Miss)
- Write Back
1. 웹서버는 모든 데이터를 Cache 서버에 저장
2. Cache 서버에 특정 시간 동안 데이터가 저장됨
3. Cache 서버에 있는 데이터를 DB에 저장
4. DB에 저장된 Cache 서버의 데이터를 삭제
* insert 쿼리를 한 번씩 500번 날리는 것보다 insert 쿼리 500개를 붙여서 한 번에 날리는 것이 더 효율적이라는 원리입니다.
* 이 방식은 들어오는 데이터들이 저장되기 전에 메모리 공간에 머무르는데 이때 서버에 장애가 발생하여 다운된다면 데이터가 손실될 수 있다는 단점이 있습니다.
Redis의 특징
Key, Value 구조이기 때문에 쿼리를 사용할 필요가 없습니다.
데이터를 디스크에 쓰는 구조가 아니라 메모리에서 데이터를 처리하기 때문에 속도가 빠릅니다.
String, Lists, Sets, Sorted Sets, Hashes 자료 구조를 지원합니다.
String: 가장 일반적인 key - value 구조의 형태입니다.
Sets: String의 집합입니다. 여러 개의 값을 하나의 value에 넣을 수 있습니다. 포스트의 태깅 같은 곳에 사용될 수 있습니다.
Sorted Sets: 중복된 데이터를 담지 않는 Set 구조에 정렬 Sort를 적용한 구조로 랭킹 보드 서버 같은 구현에 사용할 수 있습니다.
Lists: Array 형식의 데이터 구조입니다. List를 사용하면 처음과 끝에 데이터를 넣고 빼는 건 빠르지만 중간에 데이터를 삽입하거나 삭제하는 것은 어렵습니다.
Single Threaded입니다. : 한 번에 하나의 명령만 처리할 수 있습니다. 그렇기 때문에 중간에 처리 시간이 긴 명령어가 들어오면 그 뒤에 명령어들은 모두 앞에 있는 명령어가 처리될 때까지 대기가 필요합니다. (하지만 get, set 명령어의 경우 초당 10만 개 이상 처리할 수 있을 만큼 빠릅니다.)
Redis 사용에 주의할 점
서버에 장애가 발생했을 경우 그에 대한 운영 플랜이 꼭 필요합니다. : 인메모리 데이터 저장소의 특성상, 서버에 장애가 발생했을 경우 데이터 유실이 발생할 수 있기 때문입니다.
메모리 관리가 중요합니다.
싱글 스레드의 특성상, 한 번에 하나의 명령만 처리할 수 있습니다. 처리하는데 시간이 오래 걸리는 요청, 명령은 피해야 합니다.
이 외에도 Master-Slave 형식의 데이터 이중화 구조에 대한Redis Replication, 분산 처리를 위한Redis cluster,장애 복구 시스템Redis Sentinel,Redis Topology,Redis Sharding,Redis Failover등의 Redis를 더 효율적으로 사용하기 위한 개념들이 존재합니다.
Hibernate를 사용하는 애플리케이션에서Soft Delete를 구현하는 방법과 발생할 수 있는 문제들을 해결할 수 있는 방법들에 대해서 알아보겠습니다.
개발 환경
Spring Boot 2.5.10
Postgresql 14.1
Java 11(Open Jdk Azul)
구현
@Entity
@Where(clause = "deleted = false")
@SQLDelete(sql = "UPDATE posts SET deleted = true WHERE id = ?")
@Getter
@NoArgsConstructor(access = AccessLevel.PROTECTED)
public class Posts {

    @Id
    @GeneratedValue(strategy = GenerationType.IDENTITY)
    private Long id;

    @Column(nullable = false)
    private String title;

    @Column(nullable = false)
    private String content;

    @Column(nullable = false)
    private boolean deleted;

    @OneToMany(fetch = FetchType.LAZY, mappedBy = "post", cascade = CascadeType.REMOVE)
    private List<Comments> comments = new ArrayList<>();

    public Posts(String title, String content) {
        this.title = title;
        this.content = content;
    }

    public void delete() {
        this.deleted = true;
    }

    public void addComment(Comments comment) {
        this.comments.add(comment);
    }

}
@Entity
@Where(clause = "deleted = false")
@SQLDelete(sql = "UPDATE comments SET deleted = true WHERE id = ?")
@Getter
@NoArgsConstructor(access = AccessLevel.PROTECTED)
public class Comments {

    @Id
    @GeneratedValue(strategy = GenerationType.IDENTITY)
    private Long id;

    @Column(nullable = false)
    private String content;

    @ManyToOne(fetch = FetchType.LAZY, optional = false)
    private Posts post;

    @Column(nullable = false)
    private boolean deleted;

    public Comments(String content, Posts post) {
        this.content = content;
        this.post = post;
        this.post.addComment(this);
    }

    public void delete() {
        this.deleted = true;
    }

}
예제 소스 코드에서 사용할 게시글과 댓글 엔티티 클래스입니다. soft delete를 구현하기 위해 boolean 타입의 필드로 삭제 유무를 구분하고 메소드를 통해 객체의 상태를 변경하여 삭제합니다.
@Where(clause = "deleted = false")
엔티티 조회 쿼리의 where절에 반드시 포함되는 조건을 설정할 수 있습니다. 개발자의 실수로 쉽게 누락할 수 있기 때문에 애노테이션을 사용해서 글로벌하게 설정하는 것이 좋습니다. 또한 Lazy Loading으로 발생하는 조회 쿼리의 where절에 조건을 포함시키기 위해서는 반드시 사용해야합니다. 하지만 JPQL 또는 HQL이 아닌 native SQL을 사용할 때는 적용되지 않기 때문에 주의해야합니다.
@SQLDelete(sql = "UPDATE comments SET deleted = true WHERE id = ?")